Posted on

Wandering My Way Back

I must have gotten lost in my search for the great chocolate chip cookies that I have mentioned in pervious posts.  More recently, I have been pursuing great milkshakes more than cookies.  The quilt show circuit has come back in full force, it has been great to be back on the road from time to time. Welcome to readers joining me in my creative adventures.

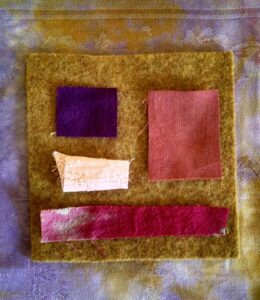
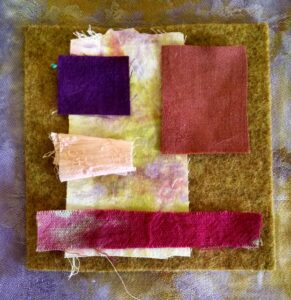
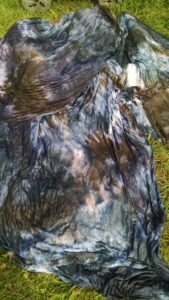
Over the past two years I had hoped to make progress finishing up older projects.  That has not gone as I planned, but I am pleased to report that this year I started and finished the largest art quilt in my oeuvre so far.  The Ohio Amish Country Quilt Show had a challenge class this year for Log Cabin quilts.  I decided to make my own creative, wonky interpretation of the traditional Log Cabin block.  Here it is:

Deconstructed Log Cabin


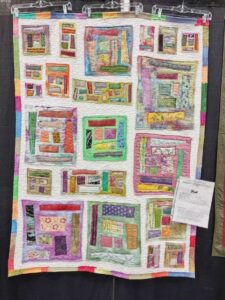
The blocks started with either chunks of dyed cotton batting or dyed vintage napkins.  I backed each base piece with muslin, and added raw edge applique scraps to the top.  Starting with a small square just off center, I kept adding longer fabric strips around the block, leaving space to show the dyed base piece colors.  Next, I went wild with hand embroidery.  After all the blocks were finished, I made a quilt sandwich from a vintage damask tablecloth, batting and backing; machine quilting the blocks to the sandwich.  I finished the quilting and binding at 10:30 PM the day before the quilt had to be turned in to make it into the show!  I am very pleased with the way it turned out, and I am happy that it is inspiring others as well.  I am looking at other traditional quilt blocks to use this raw edge technique on, and I am working on developing a future workshop in this technique.

Next week, I will be back with my latest fabric dyeing adventures.

Posted on

Wavy Lines

This is strictly technical stuff today, not the most exciting, but since this blog is a bit of journal of my creative pursuits, this is what has been on my mind the past few days.  Working with vintage textiles presents some interesting challenges, and I certainly don’t want to discourage anyone from creating with them.  Just be prepared!

My next step for my latest collage was to cut the batting and backing to size, wrap the extra 2” of backing inside the batting, put all three layers together, then quilt.  I keep going back to this idea of mine to not have a visible border or binding to my collages.  Right away, there was a problem.  My dyed damask napkin that is the base of the collage is not square.  Take a look at this wavy edge:


A bit discouraging, but I am stubborn.  I am going to make this work.  Yes, I had to re-trim my initial cut of batting… twice, despite careful measuring.  I had to trim (and trim again) so that none of the batting/backing was showing from the front.  Finally, I achieved that little goal, and wrapped the backing fabric around the batting, and ironed it into place:

So, this ended up being a fussy process, and it will be acceptable for a small project like this, but I cannot see it working at all for the larger whole tablecloth that I have in the works.  Back to the drawing board…  Meanwhile, my concern right now is quilting my trial piece.

Later in the week, I promise something much more interesting to look at!

Posted on

Working Through Challenges

Using vintage linens and working in a collage style presents some challenging problems.  Certain traditional quilt methods of assembly just don’t work well with my creative visions and materials of choice.  If you’ve visited my booth at a quilt show, you’ll know that I sell quite a few dyed vintage damask table linens.  Many of them have a nice finished edge that I want to preserve while using them in a collage.  I am still trying to come up with an easy way to bind all the layers and not lose that finished edge.  Today, I am embarking on my latest attempt at this quest.

Starting with a medium size dyed damask napkin that will be the base of the collage, I picked out a couple of smaller squares on which to stitch scrap compositions.  These smaller squares will be similar to the 4 x 4” square that I have been featuring in previous posts.  The next step was to select scraps to add to the little squares:

I pulled out more scraps than I’ll be able to use in this project, but that’s OK – it is good to have more to choose from during the early planning stages.  Next, I started working with the wool square.  Several little scraps jumped out at me, and the placement of them came together quickly.

Notice that all the pieces are separate from each other.  How would they look with a piece of fabric underneath (other than the background) that connected them together?

I like the second version, the additional piece of fabric adds another layer of interest.  I’m going to take a look at some trims and funky yarns to add, as I think I’m ready to start stitching this one over the next couple of days.

I invite you to follow along in my quest over the next week or so, will this work out, or be a dead end?  This will also be another look into my creative process.

Posted on

Murky Colors on a Sweltering Summer Day

I started a fabric dye session yesterday, and by dusk I was ready to call it quits with dyeing.  It is a physically demanding task, and with each year, I feel it more and more in my muscles and joints.  It is has also been frustrating for me not to be able to get the fabrics I’d really like, not yet anyway.  I’m still using mostly vintage damask tablecloth and other vintage textiles.  Today, I began the rinse out, and oh my, I take back all the thoughts I had yesterday:

Tea Leaves


Brushed Steel


Black, Brushed Steel and Tea leaves Blend

I also have three different batches of black to rinse out, another day!  My back needs a break before it feels broken.

The Brushed Steel and Tea Leaves have a habit of separating, resulting in some surprising random effects.  The color separation is something that I find attractive.  It adds visual interest and lends ideas for embellishing – think along the lines of trying to find images in the clouds.

Off to do some more laundry… I can’t wait to see this batch of fabric dried and ironed.


Posted on

Still Playing with Crayons

I should start an occasional feature here with the theme, “how did this happen?”

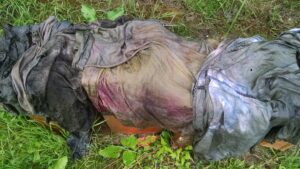
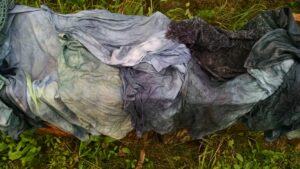
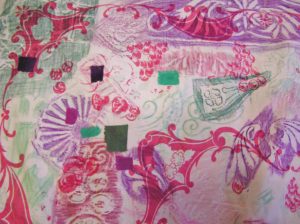
This is a detail of a larger piece in progress that has an interesting story.  Well, nearly everything I make has an interesting story, that is why I create.  Anyway, the base of this piece almost ended up in the trash.  For a while, I was buying a fair amount of box lots at a local junk auction, of which I was interested in only some of the contents.  One such box lot contained a vintage printed tablecloth that had seen better days.  There must have been other table linens in the box that were in better shape.  This one had so many holes in it, there was no way I could re-purpose it into a garment or overdye it.  This ratty tablecloth begged me to give it another chance, and so I have.  One day last summer, I took it up to the cemetery at the top of my hill, along with a bunch of crayons, and started making rubbings of the carvings on the gravestones.  I didn’t stop until most of the cloth was covered in rubbings.

My next step is to start quilting this bit of crayon craziness.  I am going to start with thread sketches of buildings that once stood in the little community that surrounded the cemetery.  Check back next week to see if I actually started any of the quilting on this or the Upcycle quilt.