Posted on

Wavy Lines

This is strictly technical stuff today, not the most exciting, but since this blog is a bit of journal of my creative pursuits, this is what has been on my mind the past few days.  Working with vintage textiles presents some interesting challenges, and I certainly don’t want to discourage anyone from creating with them.  Just be prepared!

My next step for my latest collage was to cut the batting and backing to size, wrap the extra 2” of backing inside the batting, put all three layers together, then quilt.  I keep going back to this idea of mine to not have a visible border or binding to my collages.  Right away, there was a problem.  My dyed damask napkin that is the base of the collage is not square.  Take a look at this wavy edge:


A bit discouraging, but I am stubborn.  I am going to make this work.  Yes, I had to re-trim my initial cut of batting… twice, despite careful measuring.  I had to trim (and trim again) so that none of the batting/backing was showing from the front.  Finally, I achieved that little goal, and wrapped the backing fabric around the batting, and ironed it into place:

So, this ended up being a fussy process, and it will be acceptable for a small project like this, but I cannot see it working at all for the larger whole tablecloth that I have in the works.  Back to the drawing board…  Meanwhile, my concern right now is quilting my trial piece.

Later in the week, I promise something much more interesting to look at!

Posted on

Next Step in an Experiment

Thursday already?  Time sure flies while slow stitching, strange how that works.  I have made two quick mini collages to go on the damask napkin that is my latest experiment in using these vintage textiles.  Here they are:

The collage on the left was stitched by machine with some hand embroidered details.  The one on the right was entirely hand stitched.  I think that it is time for me to measure and cut the batting and backing for the napkin base.  I am going to cut the backing fabric a generous two inches larger than the finished size.  My plan is to fold over the extra backing fabric to the inside of the quilt sandwich, then quilt to secure all of it.

There won’t be much room for error, and I am a bit nervous, since I want to use this technique on a much larger piece.  At this point, I need to just go ahead and try it and quit rethinking the process.  Find out if I succeed on Tuesday.  I need to come up with a catchy title for this piece too…


Posted on

Working Through Challenges

Using vintage linens and working in a collage style presents some challenging problems.  Certain traditional quilt methods of assembly just don’t work well with my creative visions and materials of choice.  If you’ve visited my booth at a quilt show, you’ll know that I sell quite a few dyed vintage damask table linens.  Many of them have a nice finished edge that I want to preserve while using them in a collage.  I am still trying to come up with an easy way to bind all the layers and not lose that finished edge.  Today, I am embarking on my latest attempt at this quest.

Starting with a medium size dyed damask napkin that will be the base of the collage, I picked out a couple of smaller squares on which to stitch scrap compositions.  These smaller squares will be similar to the 4 x 4” square that I have been featuring in previous posts.  The next step was to select scraps to add to the little squares:

I pulled out more scraps than I’ll be able to use in this project, but that’s OK – it is good to have more to choose from during the early planning stages.  Next, I started working with the wool square.  Several little scraps jumped out at me, and the placement of them came together quickly.

Notice that all the pieces are separate from each other.  How would they look with a piece of fabric underneath (other than the background) that connected them together?

I like the second version, the additional piece of fabric adds another layer of interest.  I’m going to take a look at some trims and funky yarns to add, as I think I’m ready to start stitching this one over the next couple of days.

I invite you to follow along in my quest over the next week or so, will this work out, or be a dead end?  This will also be another look into my creative process.

Posted on

Chickens and Candy

Being creative does NOT mean that everything you attempt will turn out successfully.  Sometimes, my ideas just don’t work out like I thought.  Today was one of those days, but I learned a few things in the process, and that’s always a good thing.

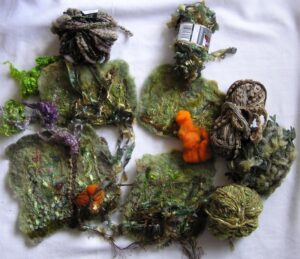
Over a year ago, I started a large art quilt that was going to be for a SAQA show.  The theme was “Upcycle,” and my idea was to create a piece using an old feed sack and somehow incorporate candy wrappers into the design.  In my very first post here, I featured the feed sack that I chose, and you will see how the candy wrappers fit into the project.

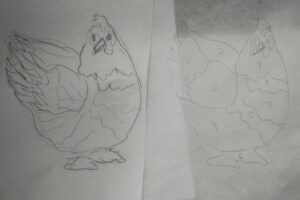
I have yet to finish the quilt, today I thought I’d try an idea I have for the candy wrappers.  My original plan was to quilt the piece with thread sketches of chickens, and add the candy wrappers as random accents.  A few days ago, I thought I’d try making collaged chickens using the wrappers and applique the chickens to the quilt.  Using one of my own drawings, I first traced the drawing onto a piece of Foundation Stuff, and made another tracing onto paper to create a pattern.  I numbered and cut out the paper pattern pieces.

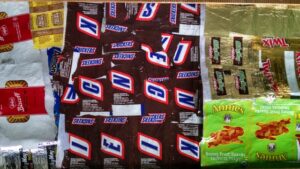
Next, I used lightweight fusible webbing to bond candy wrappers to additional pieces of Foundation Stuff.

Using the pattern pieces, I cut out pieces from the bonded candy wrappers, then assembled them on the Stuff with the drawing.  I often use a glue stick to tack pieces in place before sewing, once dry, the glue presents no problems to sew through.  However, I discovered that the glue does not work well on Foundation Stuff!  The Foundation Stuff is a new product to me, so I am learning the capabilities of it.  I was able to slather both sides of the parts I was trying to join, and weight them down until the glue dried.  Then, I carefully took the developing chicken collage to one of my sewing machines.

I use an 80 or 90 universal or topstitch needle and quality 40 or 50 weight thread when sewing with paper.  Use a long stitch length (straight or zigzag), and remember that paper will dull your needle very quickly.  I sometimes save needles that I have used for a little while, but are still useful, for sewing paper.  Once you finish your paper sewing project, discard that needle.

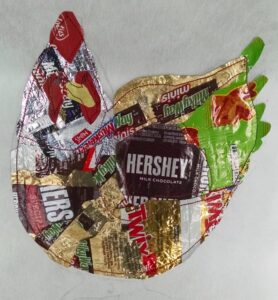
So, here is my trial chicken.  It is an interesting concept, but in the end, I just don’t like it.  I don’t like the candy wrappers, they overwhelm the chicken.  This isn’t going to work for the feed sack quilt.  At this point, I don’t even want to put the candy wrappers in the quilt at all, not even in my original plan of randomly stitching them across the surface.  Since the quilt is no longer for an upcycle challenge, I am fine with this.  Now, I am considering making 3-D fabric candy pieces for this project.  I won’t know how that idea will work out until I try it.

Later this week I will have some musings on music and trying to capture the moment that you first hear or see something that just rocks your world.

Posted on

UFO Showcase, Part Two

Sometimes, I pull out an old half-finished project and wonder, what WAS I thinking?  These two squares put the crazy in crazy quilt:

They were the result of piecing demos that I did while teaching a crazy quilt class a couple of years ago.  Obviously, I was grabbing random pieces of fabric during the demo and not paying attention to color, pattern, and the fact that they would need to be heavily stitched and embellished.  I’m not sure if I should even try to finish them, especially considering the amount of projects that I have already underway.  Part of me wants to see how much worse I can make them!  These two squares remind me of a couple of quotes from the BBC series Top Gear, “ostentatious and ghastly,” and “ambitious, but rubbish.”

Finally, what in the world will these bits become?

Chunks of wet felted wool, and funky yarns that will be transformed into more of an ongoing series.  One of the finished pieces in this mystery series has already earned me an award at a regional quilt show.  More on that next time.